The Merchant’s End 🏰
Episode 1 of Shadows of the Unnamed - A Gothic Mystery for 3-6 Investigators (Levels 3-5)
“Some doors, once opened, can never truly be closed.” - Inspector Hayes
Introduction
On a storm-wracked night in the merchant district of Ravencross, Theodore Blackwood - collector of curiosities and wealthy merchant - has been found dead in his study. The circumstances are bizarre: locked room, strange symbols drawn in ash, and his prized collection missing. Inspector Hayes, frustrated by his department’s dismissal of the “unusual elements,” seeks unofficial help.
Setting the Scene ⚡
The Blackwood Manor looms against the stormy sky, its Victorian architecture a testament to merchant wealth. Gas lamps cast wavering shadows across rain-slicked cobblestones as our investigators arrive. Thunder punctuates the scene as Wadsworth, the butler, opens the massive front door with impeccable timing.
The Players
- Wadsworth: “The study remains… exactly as we found it, ahem.”
- Mrs. Blackwood: “Oh! The horror! The tragedy! The… line?”
- Inspector Hayes: frantically scribbling in his notebook “Nothing adds up… literally, in the ledger’s case.”
Act 1: Initial Investigation 🔍
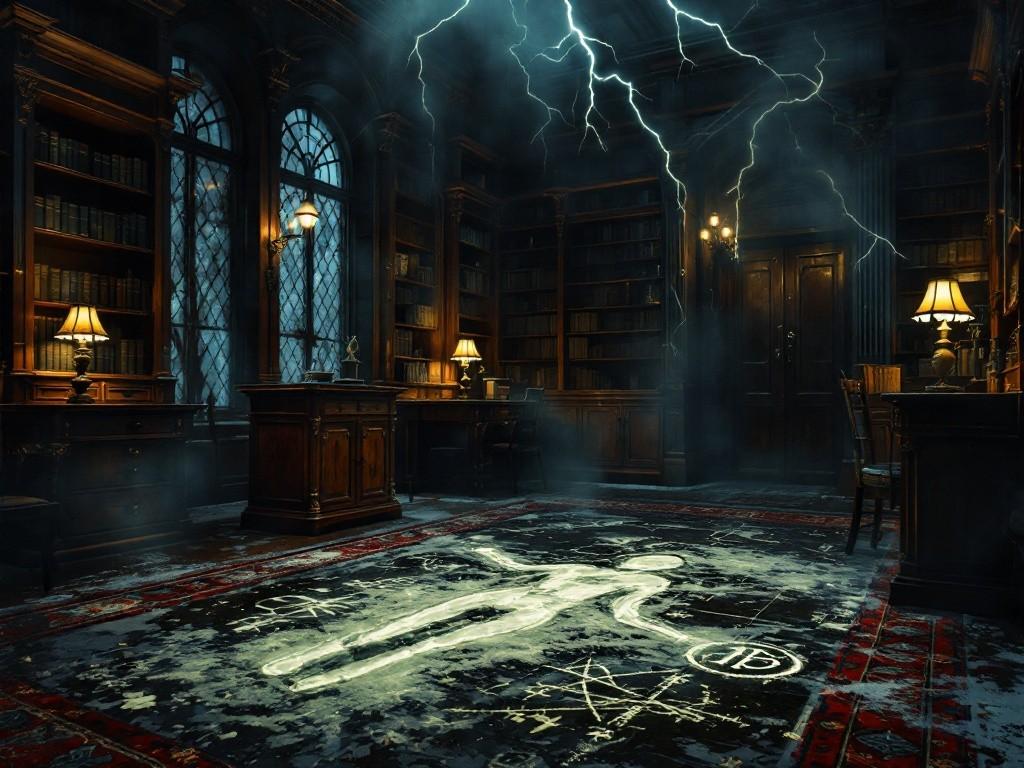
The Study
A locked-room mystery in burgundy and mahogany, now marred by death and strange symbols.
Key Features: - Body outline in chalk, surrounded by ash symbols - Empty display cases, still locked - Window mysteriously open despite being three stories up - Scattered research notes about “void-touched artifacts”
Initial Clues: 1. Butler’s footprints in ash (leads to questioning) 2. Void residue (glowing faintly under specific light) 3. Missing ledger pages (specific dates) 4. Purchase records of “questionable antiquities”
Dialogue Snapshot
Hayes: “The window was locked from the inside?” Wadsworth: “Indeed sir. Most puzzling. Tea?” Thunder crashes dramatically Wadsworth: “I do apologize for the weather’s theatrical timing.”
Act 2: The Hunt Begins 🏃♀️
The Gallery
Long and shadowy, lined with ancestral portraits that seem to follow movement.
Investigation Elements: - Portrait eyes actually do move (mechanical secret) - Suit of armor that falls at perfect comedic moments - Hidden passage behind rotating painting - Chandelier that becomes vital during chase scene
Key Events: 1. First encounter with “ghosts” (obviously cultists in sheets) 2. Mrs. Blackwood’s melodramatic testimony 3. Discovery of secret passage network 4. Wadsworth’s perfectly-timed appearances
Notable Dialogue
Mrs. Blackwood: “Theodore was acting strange ever since he acquired that… what was my line again?” Wadsworth: “The cursed artifact, madam.” Mrs. Blackwood: “Yes! The cursed artifact! swoons unconvincingly”
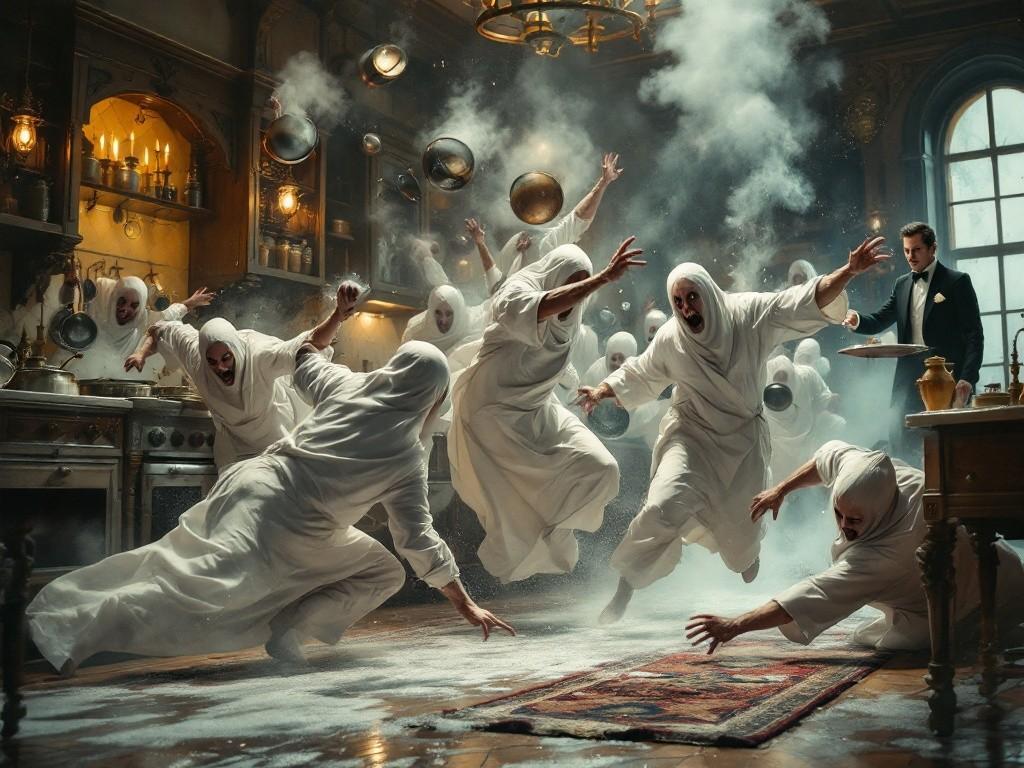
Act 3: Kitchen Chaos 🍽️
The Great Chase
A slapstick sequence through the service areas, revealing crucial evidence.
Chase Elements: - Sliding on soapy floors - Flying pots and pans - Dumbwaiter escape routes - Perfectly timed butler appearances
Service Area Features: - Multiple entrance/exit points - Dumbwaiter network connects floors - Steam pipes provide atmosphere - Storage areas hide cult materials
Action Sequence
- Cultists flee through kitchen
- Chaos erupts with cooking staff
- Dumbwaiter network reveals secret
- Evidence scattered during chase
Act 4: Confrontation 🎭
The Final Scene
Hidden passage maze leads to dramatic revelation.
Confrontation Features: - Multiple cultist reveal - Butler’s surprising assistance - Secret passage navigation - Void magic manifestation
Critical Discoveries
- Blackwood discovered void-touched artifacts
- Cult needed items for ritual
- Murder was secondary objective
- Museum connection established
Conclusion 👻
Success Conditions
- Several cultists captured
- Some artifacts recovered
- Hayes convinced of supernatural
- Connection to museum established
Consequences
- Cult aware of investigators
- Hayes becomes ally
- Void influence confirmed
- Museum investigation opens
Adventure Hooks 🎣
- Museum security detail needed
- Missing artifacts trace
- Cult retaliation incoming
- Void research continues
Running the Adventure 🎲
Tone Management
- Begin with classic haunted house
- Add comedy through NPCs
- Build genuine tension
- End with serious implications
Key NPC Notes
- Wadsworth
- Timing is supernatural
- Knows hidden passages
- Actually loyal to Blackwood
- Makes excellent tea
- Mrs. Blackwood
- Terrible actor, honest person
- Genuine grief behind act
- Knows more than she realizes
- Red herring supreme
- Inspector Hayes
- First steps into strange
- Notebook holds vital clues
- Future important ally
- Currently overwhelmed
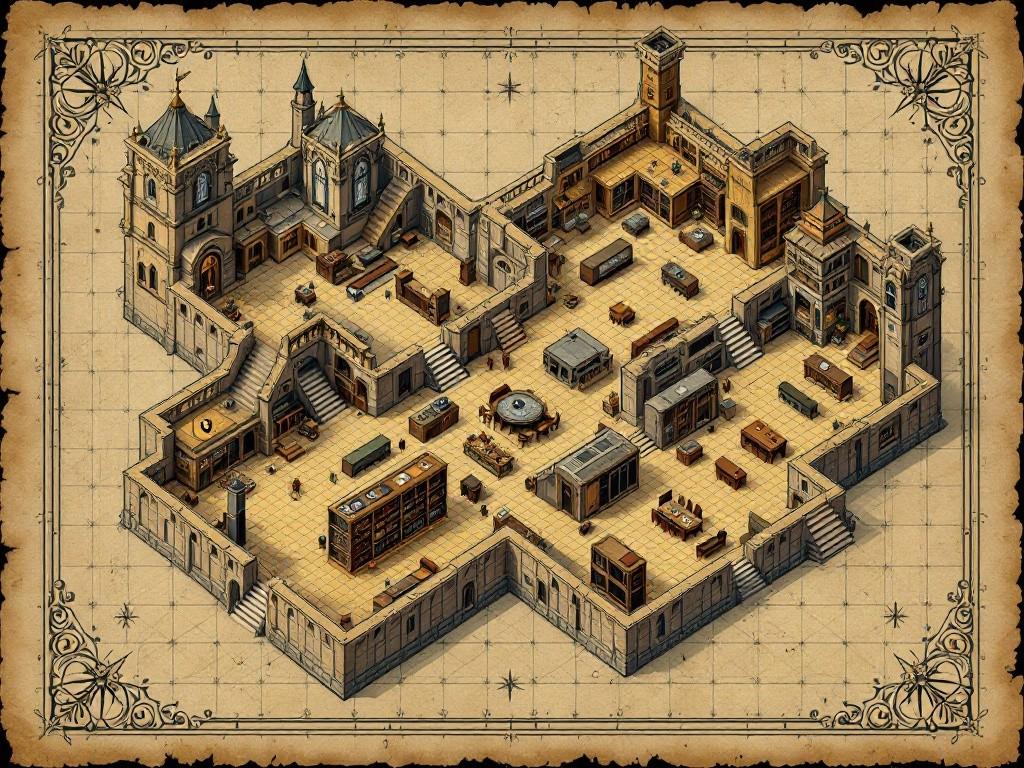
Maps and Locations 🗺️
Main Floor
- Grand Entrance
- Gallery
- Dining Room
- Kitchen
- Servants’ Quarters
Upper Floor
- Study
- Library
- Bedrooms
- Storage
- Hidden Passages
“Remember investigators, when the butler says ‘That’s most irregular,’ it’s probably a clue. When he appears behind you suddenly, it’s definitely a running gag.”